Wednesday, February 27, 2013

Canvas Wedding Keepsake using X-Press It and FabScraps!!!


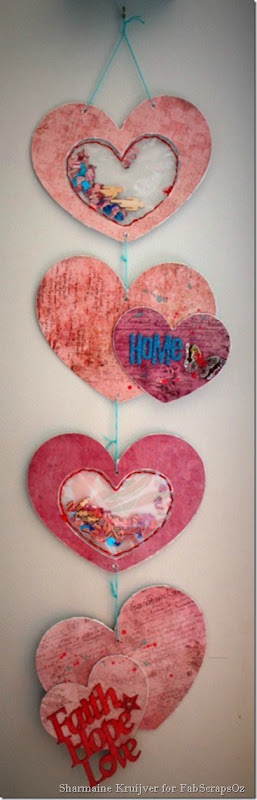
Hi everyone!!! I hope everyone is well and getting creative? Today it's Tarrah here to share with you a canvas project that I have made as a keepsake for my sister and her husband from their wedding last July.

I have used the AMAZING X-Press It and FabScraps products for this project!!
What a great combination they make together too....


First I gathered the supplies I would be using..

X-Press It Canvas
X-Press It Triple Tac
X-Press It Clear Gel Glue
X-Press It 6mm DST
X-Press It Glue Marker Pen
FabScraps Shabby Chic Diamond 12 x 12 paper
FabScraps Timeless Travel Stamp 12 x 12 paper
FabScraps Chipboard pieces
FabScraps metal butterfly, key and filigree charms
FabScraps Wooden button
FabScraps Pearls and Rhinestones

Other supplies:
Lace
Paper Heart Doily
Rectangle Paper Doily
Paint


Choose the paint you will cover your X-Press It Canvas with..

Once paint is dry, choose your desired paper and grab your trusty X-Press It Triple Tac... 

Apply the Triple Tac quite liberally all over the top of the canvas and adhere your paper down smoothing out any air bubbles. I also applied some more Triple Tac to the top edges of the paper so that it helped it to stay down.

Choose a second paper and trim down to about 5' x 7' inch, grab your X-Press It 6mm Double Sided Tape and adhere this piece down on the left side of the canvas..

Take your FabScraps chippie piece and cover with paint in your desired colour...

Take a paper doily and so that it fits with your theme, recolour it with some paint of your choice..  

Take some FabScraps pearls and a butterfly metal charm and adhere the pearls to the centre of the butterfly with some X-Press It Clear Gel Glue.

Use some more X-Press It Clear Gel Glue to layer some more FabScraps embellishments like charms, wooden buttons and chipboard pieces.. 

Add some lace and paper doilies to your project and you have a perfect keepsake for a special couple...

So what did you think? I hope I have inspired you to get out all your FabScraps and X-Press It goodies and create something beautiful!!
Thanks so much for joining me today on the X-Press It blog, happy creating and make sure to check back here again soon for more inspiring projects from the Design Team!!
  
Pin It

Thursday, February 14, 2013

Share the LOVE

Do you love the X-Press It Glue Marker as much as we do? We want to give you one! 

Head over to the X-Press It facebook page, like us, share the post with the same photo as above and leave us a comment telling us about what you love about The X-Press It range. 

100 markers are up for grabs! (You have until 11:59 pm AEST on Sunday Feb 17) Sorry, Australian Residents only- one Glue Marker per household.

Pin It

Wednesday, February 13, 2013

Home Heart Hanger

Hi all
Sharmaine here with a FabScraps creation.
I’m going to show you how I made this Home Heart Hanger using the FabScraps Heart Wall Hanging.


The pack comes with 6 pieces of chipboard, 2x these three pieces.

IMG_5076

I covered the chipboard with pattern paper. The quickest way to do this is to cover the chipboard surface with X-Press It Triple Tac Glue.

IMG_5077

Then stick it on to the pattern paper. Using a brayer I rolled over both sides of the shape, the chipboard side and the pattern paper side. This meant the surface was flat but also had a complete coat of the glue.

IMG_5078

I then cut off most of the excess paper, leaving a small amount around the edge.

IMG_5079

I left an edge because the next step was distressing.

IMG_5080

And I didn’t throw away any of the little bits of pattern paper either!
I used those to punch some tiny hearts, which I will use later in the shaker part of the hearts.


IMG_5084

The shaker parts were easy to make. I took the heart shaped chipboard, that has the heart shape removed from the center, and some packaging from some other scrappy products (anything that comes in a sturdy clear plastic bag packaging will do!).
Using masking tape I fixed the packaging in place and then using a needle and red embroidery thread I straight stitched around the heart shape, about .5cm in from the chipboard.

IMG_5085

I made sure I stopped stitching when I got up to near the opening of the packaging, because this is where I inserted my paper hearts, heart sequins and wood veneer people.

IMG_5087

When I had finished stitching around the heart I pulled it off and added some X-Press It 6mm Double Sided Tape around the back of the heart (remembering the other side is now covered with pattern paper)

IMG_5088

I then stuck stitched packaging back into place and cut off the excess.

IMG_5089

Next step was the not so hard task of pushing the holes back through the pattern paper.

IMG_5090

Now it was time to work on the solid hearts.
I added the smaller hearts to the big hearts, offsetting them off to the side.
I used the X-Press It Clear Gel Glue to adhere them and then used the bottle to weight the chipboard into place so it wouldn’t buckle.

IMG_5091

When it was dry I added some paint splats, alpha and embellishments.

IMG_5092

I also added some FabScraps chipboard, which I had painted with some mist.

IMG_5093

The very last step was to join it all together. This was also the trickiest part!
I had to make sure each heart had the same amount of space between them or it wouldn’t hang very well. Also because of the chipboard at the bottom it would be weighted to one side and look lopsided.

IMG_5094

And my Home Heart Hanger was complete.

HomeHeartHanger1

I inserted a larger girl and boy wood veneer piece in the first shaker, to represent my Husband Dave and myself (surrounded by love)

HomeHeartHanger1CloseUp

The Home is because I wanted to say home is where the heart is

HomeHeartHanger2

and my altered butterfly (using some paint and mist) is to represent the growth that the home environment allows.

HomeHeartHanger2CloseUp

Next was the other shaker heart

HomeHeartHanger3

which contains 4 small girl wood veneer pieces, representing our four girls (again surrounded by love)

HomeHeartHanger3CloseUp

and the last heart is open and contains the words Faith Hope and Love

HomeHeartHanger4

Again a symbol of what I hope our home is.

HomeHeartHanger4CloseUp

For this project I used:
X-Press It 6mm Double Sided Tape
X-Press It Triple Tac Glue
X-Press It Clear Gel Glue
FabScraps Heart Wall Hanging
FabScraps Organic Script Pattern Paper
FabScraps Organic Strawberries Pattern Paper
FabScraps Victoria’s Ballet Dress Pattern Paper
FabScraps Faith Hope Love Chipboard
FabScraps Metal Butterflies

Thanks for reading through this rather long post. I hope it’s inspired you to be creative.
Sharmaine

Pin It